How Do You Detect Water Trapped Under Ceramic Tile?
Introduction
Water trapped under ceramic tile is a hidden problem that often starts small but grows fast. Because moisture can sit beneath grout, thinset, or on a concrete slab, it can weaken adhesives, stain grout, and feed mold growth. Homeowners worry about unpleasant odors, warped finishes, and costly repairs.
How do you know if moisture lurks under your tile? Often the signs are subtle. A cool, damp spot, repeating stains, or a musty smell point to intrusion. In other cases, a slow leak from plumbing or poor waterproofing allows water to pool under tiles without obvious surface damage.
This article explains how to detect and dry water beneath tile, thinset, and concrete. We cover moisture detection methods, practical drying strategies, documentation for insurance, and when to call certified technicians. Because prompt action limits structural harm, you will learn step-by-step checks and drying options that reduce mold risk and restore flooring. As a result, readers can make informed, calm decisions about inspections, repairs, and professional restoration.
Causes and Signs of Water Trapped Under Ceramic Tile
Water under tile hides for months. It starts quietly yet can cause structural and health problems. Homeowners should watch for both cause and effect so they can respond quickly.
Common Causes of Water Trapped Under Ceramic Tile
- Leaking plumbing: Pipes under the slab or inside walls can release water slowly.
- Damaged grout or missing sealant: Cracked grout lets surface water sink into thinset.
- Broken or loose tiles: A cracked tile gives direct access to the mortar bed.
- Poor waterproofing: Inadequate membranes allow moisture migration from beneath.
- Flooding and slab moisture: Groundwater or slab vapors push moisture up into the tile system.
Visual and Olfactory Signs
- Discoloration or dark patches on grout and tiles.
- A persistent musty or moldy smell in the room.
- Loose, hollow, or popping tiles when tapped.
- Efflorescence: white powdery salts on grout or tile.
- Warped thresholds or swollen trim near tile edges.
If you suspect trapped moisture, act quickly because mold can develop within days. For guidance on mold safety, see the EPA page. For restoration standards and certified pros, visit IICRC.
Early detection saves money and limits structural damage. Therefore hire a licensed inspector or restoration contractor if signs persist or staining returns.
Comparing Common Solutions
If you suspect water trapped under ceramic tile, compare the options below to choose the fastest, most durable fix. Below is a quick table that summarizes typical costs, timeframes, and when each method makes sense.
| Method | Cost | Time Required | Effectiveness | When to Use |
|---|---|---|---|---|
| Surface drying with air movers and dehumidifiers | Low–Moderate | 1 to 7 days | Moderate — effective for surface and thinset moisture | Use for recent spills, minor moisture, or when tiles remain bonded |
| Tile removal and substrate drying | Moderate–High | 3 to 14 days | High — addresses moisture in mortar and slab | Use when persistent moisture, mold growth, or delamination occur |
| Spot removal with injection or port drying | Moderate | 2 to 10 days | High for localized pockets | Use for isolated wet spots under tile without full floor removal |
| Epoxy or topical sealants | Low–Moderate | 1 to 3 days | Low–Moderate — reduces vapor but not large liquid ingress | Use as a vapor mitigation step after substrate dries or for minor vapor issues |
| Plumbing repair and leak detection | Varies | Hours to days | High — removes source and prevents recurrence | Use when a plumbing leak or pipe failure is suspected |
| Full floor replacement | High | 1 to 3 weeks | Very high — permanent correction | Use for severe structural damage, persistent failures, or repeated losses |
For water damage mitigation or plumbing solutions, prioritize repairing the source and using certified drying methods to limit mold and substrate damage.
Step-by-Step Remediation and Prevention Tips
When you discover water trapped under ceramic tile, act quickly. Because trapped moisture can damage thinset, grout, and the concrete slab, prompt remediation limits costs and mold growth.
- Confirm the source
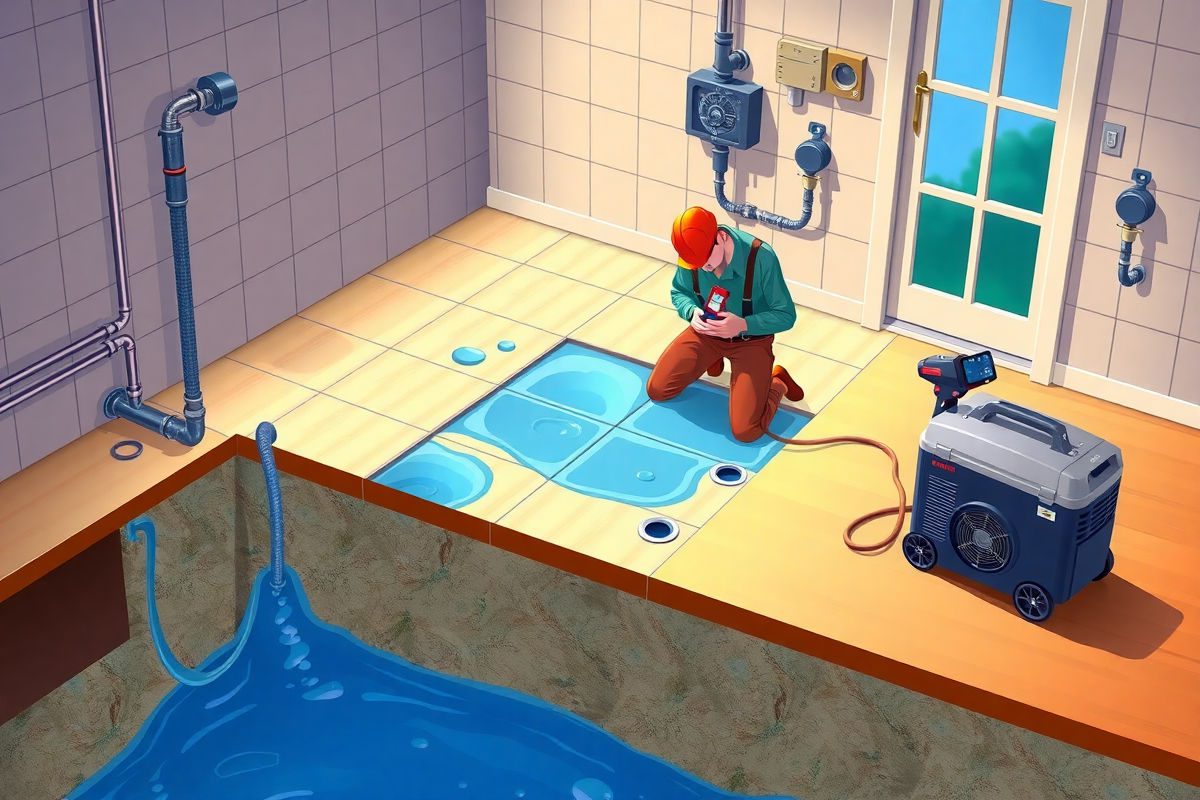
- Start by isolating water entry points. Check visible plumbing, appliances, and nearby wet areas. Use a moisture meter and infrared camera for noninvasive checks. If you suspect a leak, arrange a plumbing camera inspection or pressure test immediately.
- Document conditions for insurance
- Photograph stains, warped tiles, and any mold. Note dates and times. Good documentation helps during claims and when you hire a restoration contractor.
- Carry out preliminary water cleanup
- Remove standing water and dry surface areas using towels and wet vacuums. Then place air movers to increase airflow. For large events, contact a water cleanup professional.
- Perform a moisture assessment
- Measure moisture in tile, thinset, and concrete. Track readings over time. Therefore you can confirm drying progress and know when structural drying completes.
- Choose the right structural drying plan
- For shallow moisture, position air movers and a low-grain refrigerant dehumidifier. For deep or slab moisture, use heated drying, desiccant dehumidifiers, or localized injection port drying. Injection port drying can extract water from under tile without full removal.
- Remove and dry when needed
- If tiles delaminate or mold grows, remove affected tiles. Dry the mortar bed and slab completely before reinstallation. As a rule, do not re-tile until moisture readings reach acceptable baseline levels.
- Repair the source and plumbing
- Fix leaks, replace damaged pipes, and improve drainage. Then pressure-test repairs. Because recurrence causes repeated losses, resolve the root cause before finishing repairs.
- Seal and restore
- Use epoxy or polymer-modified grout for high-moisture zones. Reapply silicone seals around fixtures and transitions. Epoxy grout improves water resistance and supports long-term mold prevention.
- Verify and monitor
- Recheck moisture with meters. Monitor humidity and tile adhesion for several weeks. Maintain indoor relative humidity below 60 percent to reduce mold risk.
- Long-term prevention
- Schedule annual plumbing inspections. Improve waterproofing under wet areas. Use appropriate membranes during renovations. Finally, educate occupants on prompt reporting of leaks.
Professional tip: hire IICRC-certified technicians for complex losses and structural drying plans. For guidance on mold prevention and cleanup, see the EPA mold resources and standards from the IICRC.
Conclusion
Ignoring water trapped under ceramic tile invites structural damage, mold growth, and costly repairs. Because moisture undermines thinset and adhesives, tiles can delaminate and pockets of mold can form behind floors. Therefore act promptly when you see stains, a musty smell, or hollow-sounding tiles.
A fast, documented response reduces risk and insurance headaches. Start with source control, then use measured water cleanup and structural drying to drive moisture down to safe levels. If a leak or slab moisture causes the problem, hire a plumber to stop the source. For complex drying, use IICRC-certified technicians because they follow proven protocols.
If you delay, repairs become larger and more expensive. However, timely remediation restores adhesion and prevents health hazards. As a result, homeowners save money and protect indoor air quality.
Recommended Service: discover this trusted partner.
Company profile: This project provides practical and educational content on water damage mitigation and plumbing services across the United States. Our goal is to help homeowners understand the risks associated with leaks, floods, moisture, mold, and common plumbing issues. We share clear, accessible information on water cleanup, structural drying, damage inspections, mold prevention, and reliable plumbing solutions. All of our content is designed to support home safety and maintenance, backed by the availability of certified technicians in every state, ready to assist 24/7 nationwide. Nothing in our articles replaces professional evaluations, repairs, or recommendations from qualified specialists.
Frequently Asked Questions (FAQs)
What causes water trapped under ceramic tile?
Leaks from plumbing, damaged grout, cracked tiles, poor waterproofing, and slab moisture are common causes. Even small grout gaps let surface water reach thinset and the concrete slab.
How can I tell if moisture sits under my tile?
Look for discoloration, a persistent musty smell, hollow-sounding tiles, efflorescence, or cool damp spots. A handheld moisture meter or infrared camera speeds up noninvasive detection.
Can I dry the problem myself?
For minor events, yes. Remove standing water, run air movers and dehumidifiers, and document readings. However, deep slab moisture or visible mold needs professional structural drying.
When should I call a restoration or plumbing pro?
Call when leaks persist, tiles delaminate, mold appears, or moisture readings stay high. Certified technicians offer leak diagnosis, targeted drying, and long-term prevention plans.
Will insurance usually cover repairs?
Coverage varies by policy and cause. Therefore document damage, notify your insurer promptly, and get contractor estimates. Water damage mitigation and plumbing solutions may be covered depending on the claim.